I was just about to hop into a quick little video editing project, and I thought this is a great opportunity to show you one of my favorite pieces of software ever. It’s called Recut, and it has literally saved me hours on my content creation workflow by automatically removing dead space and slicing my recordings into shorter clips for streamlined editing.
If you make videos or even podcasts (it works with audio too!) this could be a game changer.
Cut the fat from your content!
Vloggers and podcasters must strive to make their content as valuable and engaging as possible. As important as it is to include interesting, relevant, and entertaining content, it’s just as important to remove anything that isn’t. Just because someone starts watching your video doesn’t mean they will stay. Keep your content tight. Eliminate filler and anything that doesn’t closely support your main idea. And yes, even eliminate silence – or at least the stumbles, “umms,” and long pauses that can derail a viewer’s attention momentum.
Manually scrubbing through a recording to identify these dead spots is tedious. There are plenty of tricks – like using the audio waveform to find long silences – that can help. But it’s still tedious, and a less than thrilling way to kick off an editing project.
That’s where Recut comes in.
Recut takes care of the bulk of prep work and gives you a huge jump start on edit. In some cases, Recut could even take care of the edit as well.
Let’s take a closer look.
How to use Recut
You can download Recut from getrecut.com. And let’s just take a minute to admire how simple their home page is, and how clearly they present the problem and how they solve it.

Brilliant. Donald Miller would be proud.
I’ll tell you what, they make good on their value proposition.
Importing recordings
You just open Recut, and then drag in a video file of your choice. You can also save yourself a trip to another program and record a video directly through Recut’s interface. The app gets to work right away, identifying quiet/silent sections of your video. The parts to be removed are highlighted in pink, but you can click on any of these segments to dequeue is from deletion. You can also select additional clips that you do want to delete – bad takes or other pieces that you don’t want to pass along to the next stage of your edit.
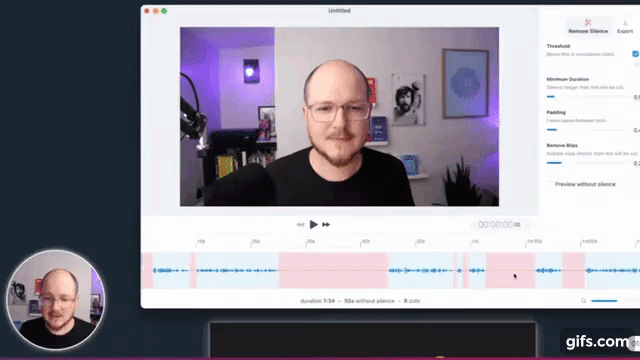
Recut’s settings panel
In the settings panel, you can change the duration of the silences and modify the padding (how much space it will leave before and after a cut). You can also configure it to remove blips. So even if there is sound present, if it’s a short blip or pop (something shorter than a typical spoken word), you can delete those as well.
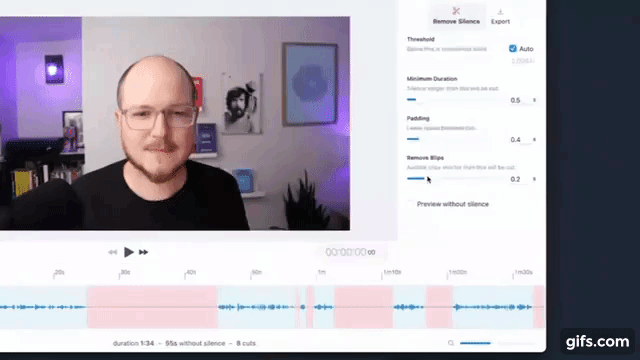
After you dial in your settings, you can preview your video (sans silences), and proceed to the Export panel.
Exporting recordings from Recut
If your audio/video editing needs are fairly simple – you just need to remove silences, bad takes, and other isolated content – you can choose to export a new video file and call it a day. Or, if you have more editing to do, you can export it as project file to send to your editing software. Recut works natively with Final Cut Pro, Screen Flow, Adobe Premiere, and DaVinci Resolve. You can also export XML files or EDL files to work with a few other video editing programs (Here is a tutorial on how to import an XML file to iMovie project).
Finishing your edit
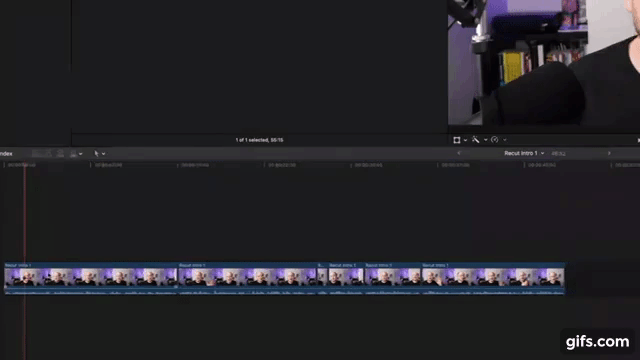
For the remainder of this overview, I will be using Final Cut. Exporting a project file is almost instantaneous. Double click the new FCPXML file and choose the library you want to import the video into. A new Event will be created, and inside of that we’ll find our project with our video neatly sliced and diced and ready for phase two of your editing workflow. You can watch my video walkthrough to see how easy it is to find and delete multiple takes.
Note: If you have multiple recordings, each one will be imported into FCP as its own separate Event and Project. You just need to copy and pasting the clips from one timeline to another to consolidate your clips into a single project.
Pricing
Recut doesn’t do much, but what it does, it does very well and saves you a ton of time. Hop over to getrecut.com, and you can download it there for Mac or their newly released Windows version.
It is free to download and test drive for five exports. After that, you can buy a license. It’s normally a one-time purchase of $99. But if you decide to purchase a license through the link below, you can save a little bit of money.
Conclusion
I cannot overstate just how much time this tool has saved me. And it’s not just the time it saves you from having to slog through and cut out silences. It speeds up the entire process, because I have a lot more momentum and excitement going into my edits now. I get to kick off my projects with what feels like a magic trick. Just drag the video into Recut, click export, and poof – a rabbit out of a hat.
It really is fun to use, but in the words of a great Mr. Burton, “Don’t take my word for it…”
You can download it and try it out for yourself. Remember, you get five free exports, so bring a stopwatch, see how much time you save. And then subscribe to my YouTube channel, because I have a lot more helpful tools and tips for you coming your way!